How to Set Up Your Own DNS Server with Tailscale for Free
A complete guide to setting up AdGuard Home as your own DNS server, secured with Tailscale VPN for private, ad-blocking DNS across all your devices.
I have been self-hosting quite a lot recently, and one of the first things people recommend you to self-host is your very own DNS server. I'll try to make this as simple as I can so it's easy to understand.
Note: This guide assumes you have a remote server you can use, but even if you don't, you can follow the exact same steps and set it up on a spare laptop or computer that you might have which will have access to the internet 24/7.
What is DNS?
DNS stands for Domain Name System. Think of it as the phonebook of the internet. When you type harshalranjhani.in into your browser, your computer does not actually know where that is. It asks a DNS server, which translates that human-readable name into an IP address like 104.21.27.105 that computers use to communicate. Without DNS, you would have to memorize numeric IP addresses for every website you visit.
By default, your ISP assigns you a DNS server, which means every domain lookup you make passes through their infrastructure. They can see every site you visit, log it, and in many cases sell that data to advertisers. Running your own DNS server puts that control back in your hands.
Do I Need My Own DNS?
Not everyone does. If you are on a managed network at work, or you are not particularly concerned about ad tracking, or you just want things to work without thinking about them, your ISP's DNS is fine.
Where it starts to make sense is when you care about privacy, want network-wide ad and tracker blocking without installing anything on individual devices, or are already running other self-hosted services and want more visibility into what your devices are actually talking to.
Where it does not make sense is if you are not prepared to maintain it. If your DNS server goes down and you have not set a fallback, every device depending on it loses the ability to resolve domain names. It is a small operational responsibility, and worth being honest with yourself about whether you want that.
But don't worry — we'll also set up a fallback, and we're not going to activate it on the router directly. Instead, we'll use Tailscale to solve this problem.
What is AdGuard Home?
AdGuard Home is a free, open-source, self-hosted DNS server. It works by intercepting DNS queries from all devices on your network and filtering out requests to known ad-serving, tracking, and malicious domains before they even load. Unlike browser extensions that only work on one device, AdGuard Home works at the network level, meaning every device connected through it gets the same protection, including smart TVs, phones, and IoT devices that cannot run extensions.
It comes with a clean web dashboard, support for encrypted DNS protocols like DNS-over-HTTPS and DNS-over-TLS, built-in blocklists, query logging, and the ability to write custom filtering rules. It is comparable to Pi-hole but ships with more features out of the box.
Here's what the AdGuard Home dashboard looks like:
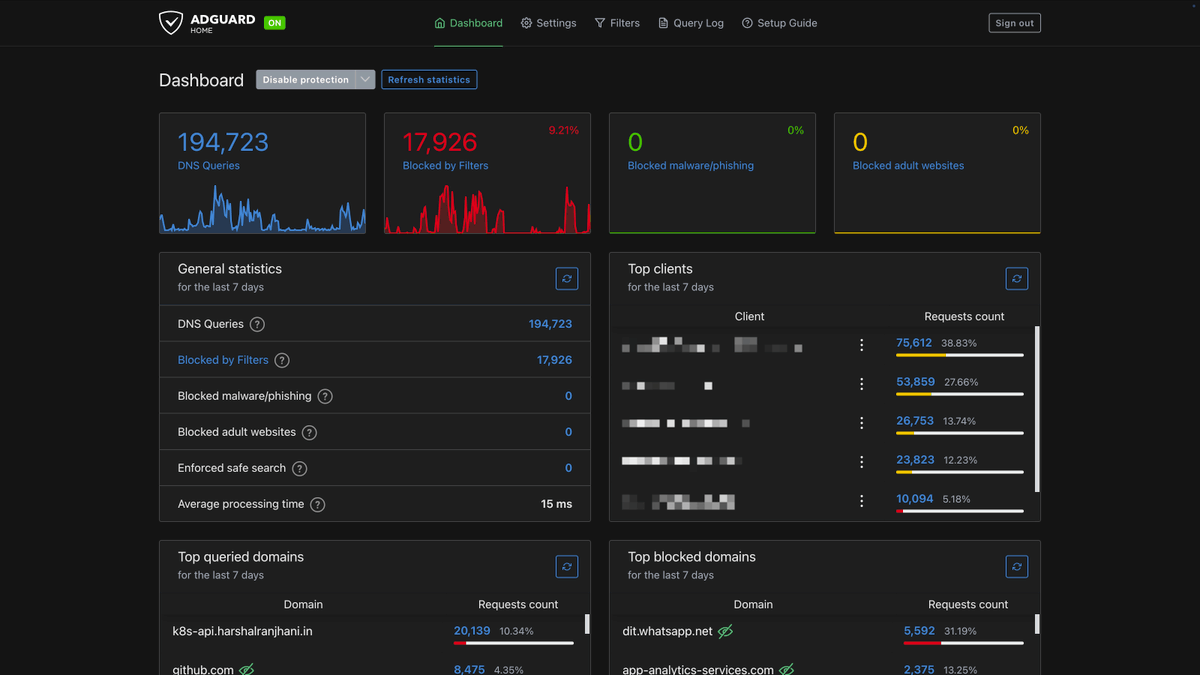
If you're a data nerd like me, I'm sure you're going to enjoy this!
What is Tailscale?
Tailscale is a free VPN service built on WireGuard. It creates a private mesh network, called a tailnet, between all your devices. Once your devices are on the same tailnet, they can communicate with each other securely over the internet as if they were on the same local network.
The reason you need Tailscale here is simple: your DNS server should not be exposed to the open internet. Port 53, the standard DNS port, gets probed constantly by bots and bad actors. Tailscale lets your devices reach your DNS server privately without ever opening that port to the public.
Also with Tailscale, you can change your default DNS server to AdGuard Home whenever you're connected to it, and when you're not, it'll just fall back to the one your ISP uses or something else that you might have set for yourself. So even if the server goes down, the DNS won't stop working!
Where to Run This
This guide walks through setting up AdGuard Home on a remote VPS (Virtual Private Server), which is the recommended approach. A VPS runs 24/7 in a data center, has a stable connection, and does not depend on your home internet being up.
That said, you can absolutely run this on a local machine, like a Raspberry Pi, an old laptop, or a spare PC at home, as long as it stays on and connected to the internet at all times. The setup steps are the same. The only difference is that a home machine is subject to power outages, ISP downtime, and reboots. If your DNS server goes down, every device using it will lose the ability to resolve domain names until it comes back.
Prerequisites
Before starting, you'll need:
- Ubuntu 24.04 VPS (or local machine) with root or sudo access
- A Tailscale account (free at tailscale.com)
- UFW firewall enabled on your server
Part 1: Install AdGuard Home
SSH into your server and run the official install script:
curl -s -S -L https://raw.githubusercontent.com/AdguardTeam/AdGuardHome/master/scripts/install.sh | sh -s -- -vThis installs AdGuard Home to /opt/AdGuardHome/ and creates a systemd service.
If you ever need to uninstall it, you can run the same script with the -u flag or remove it manually:
# Uninstall via script
curl -s -S -L https://raw.githubusercontent.com/AdguardTeam/AdGuardHome/master/scripts/install.sh | sh -s -- -v -u

# Or manually
sudo /opt/AdGuardHome/AdGuardHome -s uninstall
sudo rm -rf /opt/AdGuardHomePart 2: Install and Configure Tailscale
Add the Tailscale repository and install it:
curl -fsSL https://pkgs.tailscale.com/stable/ubuntu/noble.noarmor.gpg | sudo tee /usr/share/keyrings/tailscale-archive-keyring.gpg >/dev/null
curl -fsSL https://pkgs.tailscale.com/stable/ubuntu/noble.tailscalekeyring.list | sudo tee /etc/apt/sources.list.d/tailscale.list

sudo apt-get update && sudo apt-get install tailscaleConnect your server to your Tailscale network. The --accept-dns=false flag is important here because you do not want Tailscale overwriting the DNS settings on the server itself:
sudo tailscale up --accept-dns=falseFollow the authentication URL in the output to approve the machine in your Tailscale admin panel. Once connected, get your server's Tailscale IP:
tailscale ip -4Note this IP down. It will look something like 100.64.x.x and you will need it throughout the rest of the setup.
Recommended: For a server, disable key expiry so your connection does not drop after 180 days. Go to the Tailscale admin console, find your server, click the three-dot menu, and select "Disable key expiry."
Part 3: Configure AdGuard Home
Stop the AdGuard Home service before editing its configuration:
sudo /opt/AdGuardHome/AdGuardHome -s stopOpen the configuration file:
sudo nano /opt/AdGuardHome/AdGuardHome.yamlUpdate the http and dns sections as follows. Replace 100.64.1.5 with your actual Tailscale IP from the previous step:
http:
  address: 0.0.0.0:3000 # Listen on all interfaces for web UI

dns:
  bind_hosts:
    - 127.0.0.1 # localhost
    - 100.64.1.5 # Your Tailscale IP (replace with yours)
port: 53Binding DNS to your Tailscale IP means only devices on your tailnet can reach the DNS server on port 53. The web UI at port 3000 is set to listen on all interfaces for now, but the firewall rules in the next step will restrict who can actually reach it.
Start AdGuard Home again:
sudo /opt/AdGuardHome/AdGuardHome -s startIf this is a fresh install, complete the setup wizard by navigating to http://YOUR_TAILSCALE_IP:3000 from any device already on your tailnet. Set a strong admin username and password here.
Part 4: Configure the Firewall
This step is critical. You need to make sure port 53 and port 3000 are never accessible from the public internet, while still being reachable from Tailscale and Docker (for the tunnel).
Apply the following firewall rules in order. UFW evaluates rules sequentially, so allows must come before denies:
# SSH first, always
sudo ufw allow 22/tcp

# Allow DNS via Tailscale only
sudo ufw allow in on tailscale0 to any port 53 proto tcp comment 'Allow DNS on Tailscale'
sudo ufw allow in on tailscale0 to any port 53 proto udp comment 'Allow DNS on Tailscale'

# Block everything else on these ports
sudo ufw deny 53/tcp comment 'Block external DNS TCP'
sudo ufw deny 53/udp comment 'Block external DNS UDP'
sudo ufw deny 3000/tcp comment 'Block external AdGuard web UI'

sudo ufw enable
sudo ufw status numberedVerify that AdGuard Home is listening on the correct interfaces:
sudo netstat -tlnp | grep AdGuardHomeYou should see entries for 127.0.0.1:53, your Tailscale IP on port 53, and port 3000.
Part 5: Set AdGuard Home as Your Tailscale DNS
Here is where things get interesting. We will configure Tailscale to use our AdGuard Home as the DNS instead of configuring it on a router level. This way, whenever any device is connected to Tailscale, it's going to use AdGuard Home for DNS.
- Go to the Tailscale DNS settings
- Under "Global nameservers," add your server's Tailscale IP
- Enable "Override local DNS"
Every device connected to your Tailscale network will now automatically use your AdGuard Home instance for DNS, regardless of where in the world it is.
Test it from any connected device:
nslookup google.com YOUR_SERVER_TAILSCALE_IPIf this fails, that means somewhere the configuration went wrong. You should see an IP address being resolved once you run this, and you can also confirm by going to your dashboard and seeing an entry there.
Using the AdGuard Home Dashboard
Once everything is running, the dashboard at http://YOUR_TAILSCALE_IP:3000 is where you manage everything. Here are the most useful things to configure right away.
Adding Blocklists
Go to Filters > DNS blocklists > Add blocklist. AdGuard Home ships with a few built-in lists you can enable with one click, but the community maintains far more comprehensive ones. A good starting point is the Firebog Tick List, which curates a set of well-maintained blocklists with low false-positive rates. Add the ones that match your needs, save, and AdGuard Home applies them immediately without a restart.
Configuring Clients
Under Settings > Client Settings, you can add individual devices by their IP or MAC address and give them a name. This makes the query log readable since you will see "iPhone" or "MacBook" instead of raw IP addresses. You can also assign per-client settings here, such as disabling filtering entirely for a specific device, or applying a different blocklist profile to a particular machine.
Query Log
The query log under Filters > Query Log shows every DNS request made by every device in real time. It is the fastest way to see what is being blocked, whitelist a domain that was incorrectly caught, or spot a device that is phoning home somewhere unexpected. You can search by client, domain, or status and whitelist or block anything directly from this view with one click.
Custom Filtering Rules
Under Filters > Custom filtering rules, you can write your own rules in AdGuard's syntax. The most common use case is whitelisting a domain that a blocklist is incorrectly blocking, which you do by adding: @@||domain.com^.
You can also block specific domains manually with ||domain.com^ if they are not covered by your lists.
Upstream DNS
Under Settings > DNS Settings, you can configure which upstream DNS provider AdGuard Home forwards non-blocked queries to. The default works fine, but if you want encrypted DNS you can switch to DNS-over-HTTPS providers like Cloudflare (https://dns.cloudflare.com/dns-query) or Quad9 (https://dns.quad9.net/dns-query). This means even the queries that pass through your filter are encrypted between your server and the upstream resolver.
Updating AdGuard Home
AdGuard Home has a built-in update mechanism. You can trigger it from the web UI under Settings > General > Check for Updates, or manually:
cd /opt/AdGuardHome
sudo ./AdGuardHome -s stop
sudo ./AdGuardHome --update
sudo ./AdGuardHome -s startConclusion
If you are running this on a local machine rather than a VPS, the setup is identical. The only tradeoff is that your DNS availability is tied to your machine's uptime and your home internet connection. For most people that is perfectly fine.
If you want to go a step further and access the AdGuard Home dashboard from a public URL with HTTPS rather than through Tailscale, you can do that for free using Cloudflare Tunnel. It lets you expose the dashboard on your own domain without opening any ports on your server.
Happy self-hosting! 🚀