# Learn Redux Toolkit for State Management in React
> Learn the basics of Redux Toolkit and how to use it for state management in React applications.
By Harshal Ranjhani · [HTML version](https://harshalranjhani.in/blog/learn-redux-toolkit-for-state-management-in-react)
> Resources: https://github.com/harshalranjhani/redux-toolkit-blog-resources
Redux Toolkit is a package that helps you write Redux logic in a more efficient way. It provides a set of tools and best practices that can help you write Redux code faster and with less boilerplate. In this article, we will learn the basics of Redux Toolkit and how to use it for state management in React applications.
## What is Redux and why do we need it?
Redux is a state management library for JavaScript applications. It helps you manage the state of your application in a predictable way. Redux is commonly used with React, but it can be used with any JavaScript framework or library.
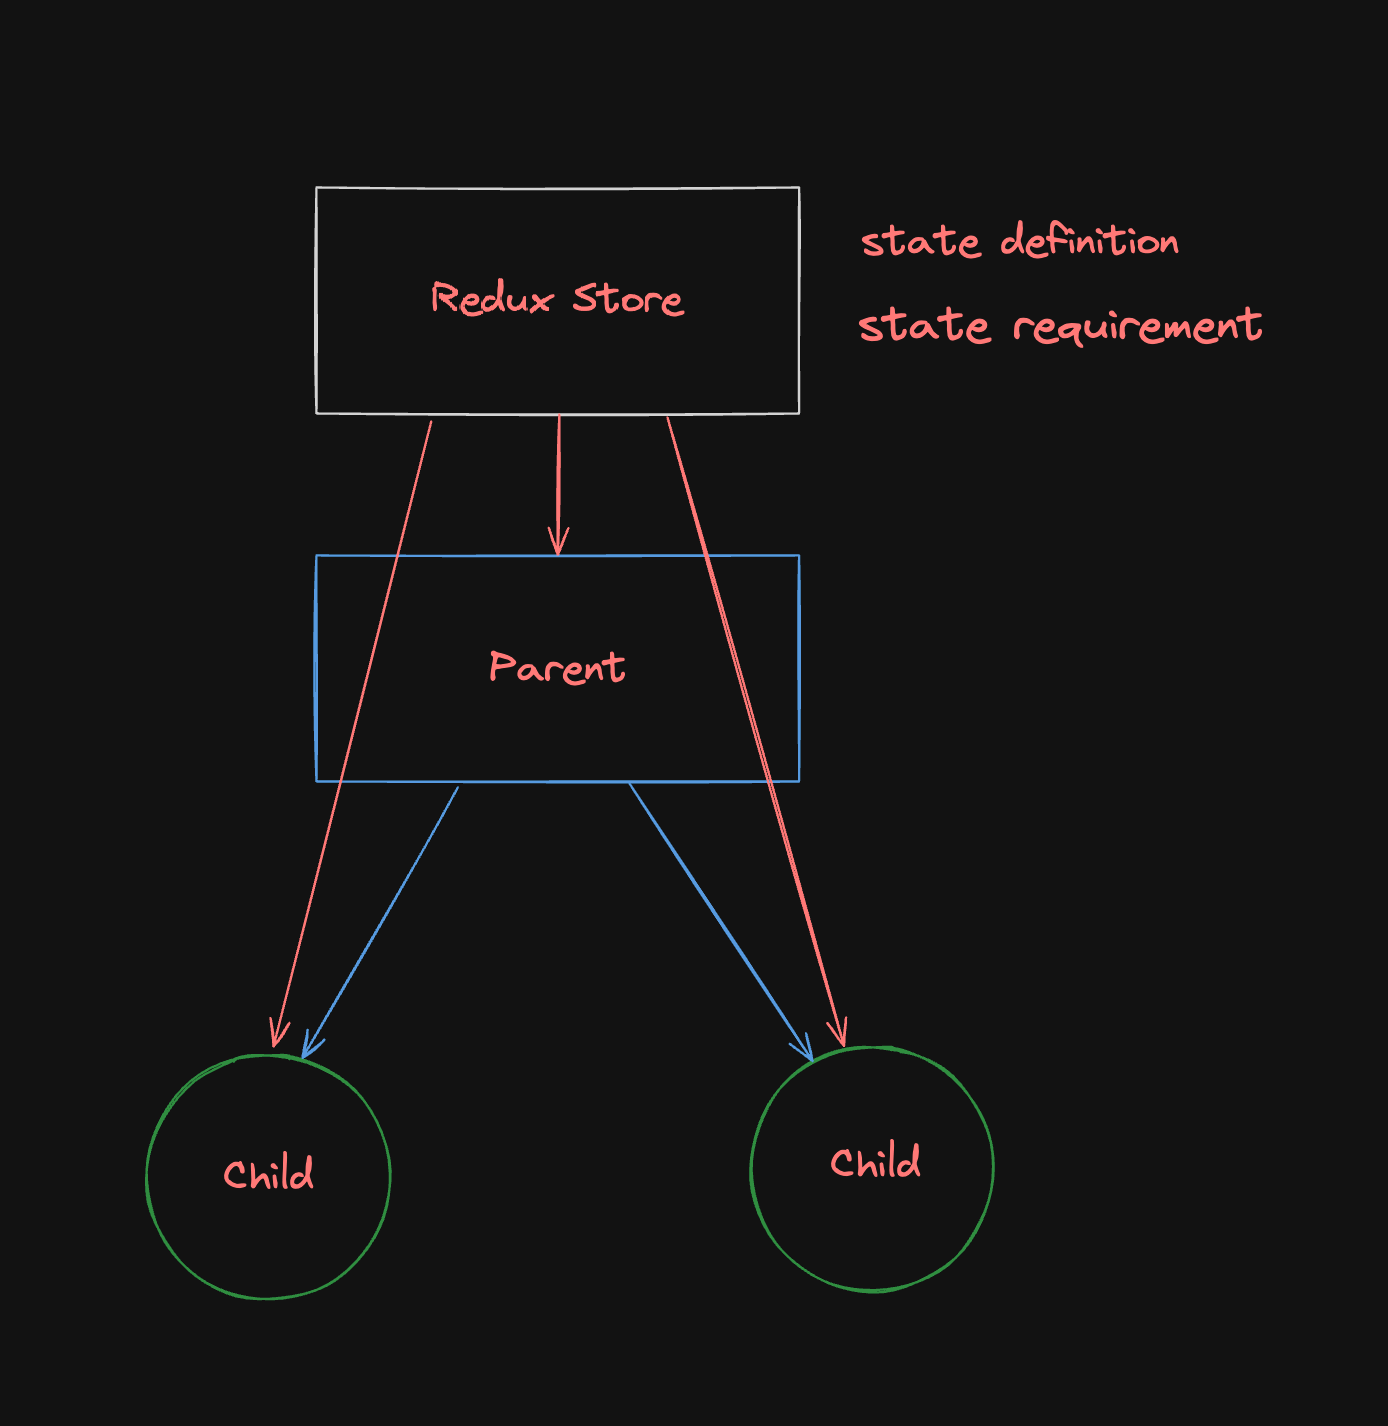
Redux is useful when you have a complex application with a lot of state that needs to be shared between different components. It provides a centralized store where you can keep all your application state and update it in a predictable way.
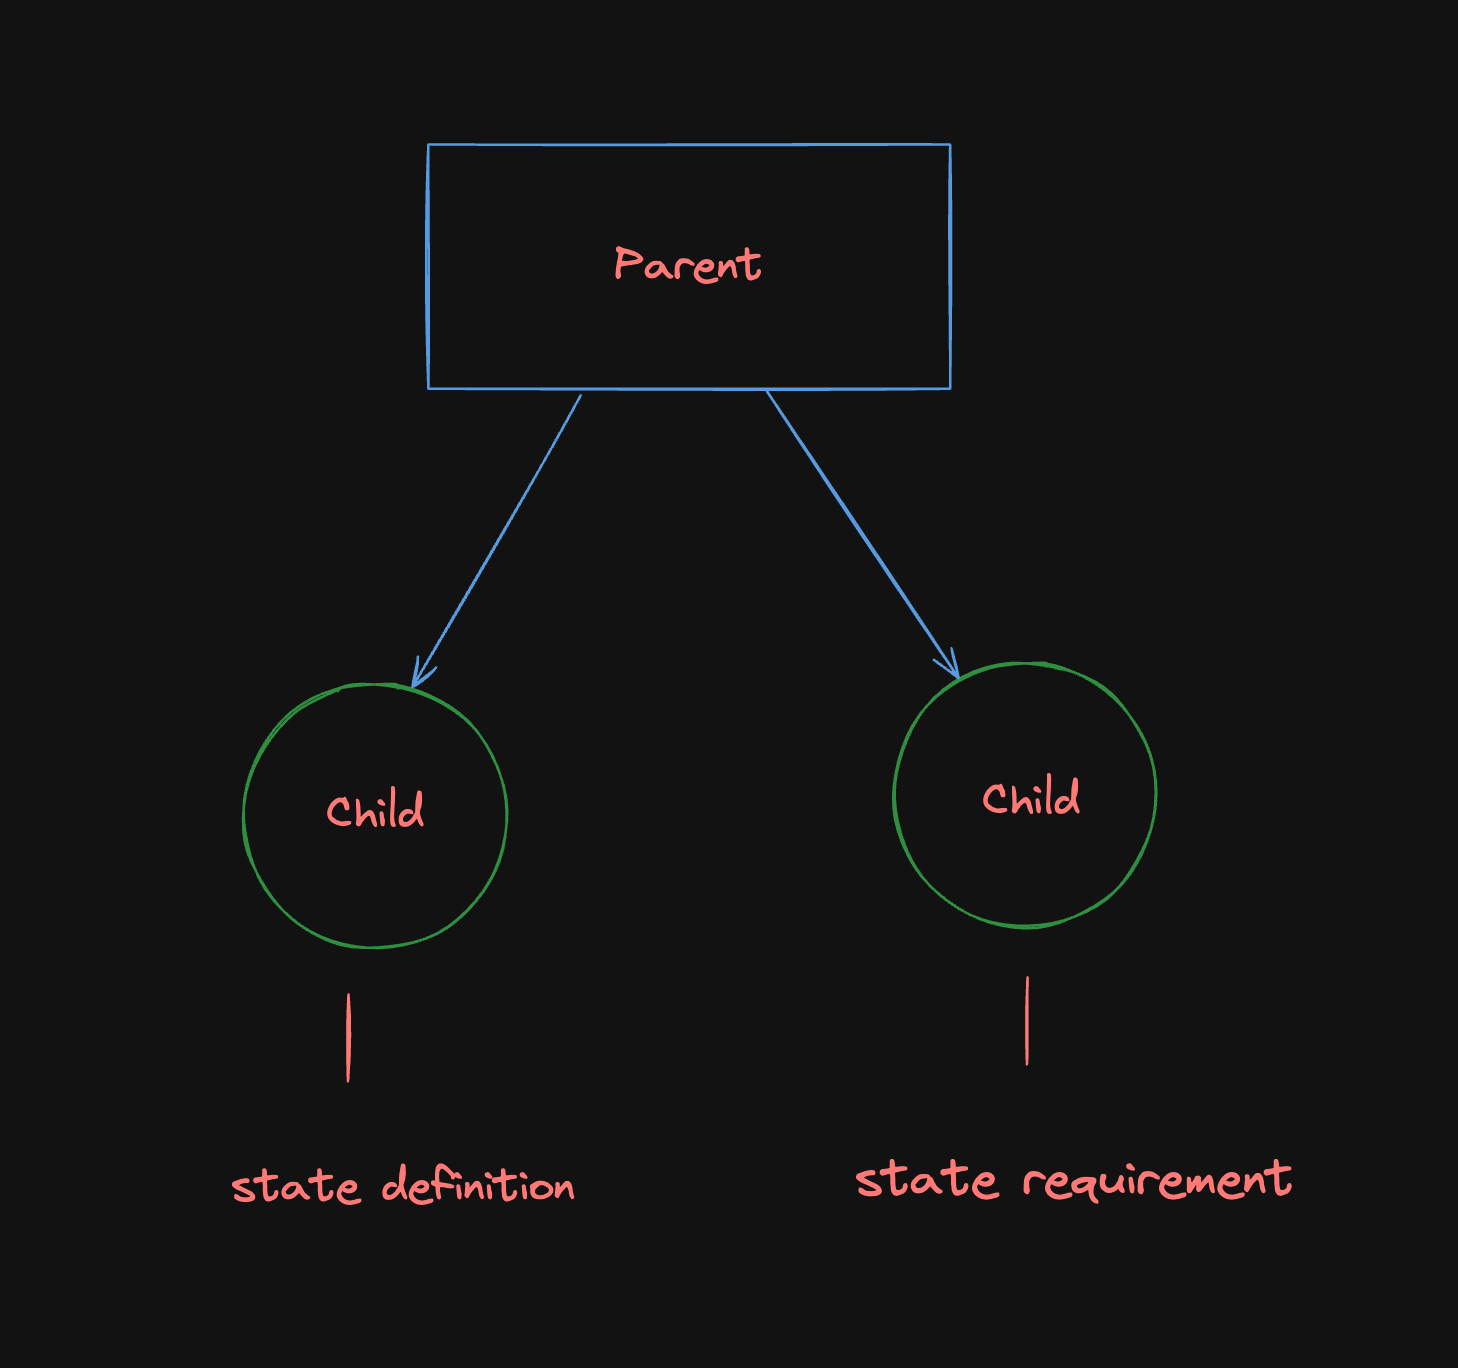
One very important use case for Redux is when you have multiple child components that need to share state with each other. When the state is defined in one child component, it can be difficult to pass that state up to the parent component and then down to the other child components. Redux provides a centralized store where all the components can access the state directly.
Without Redux:
With Redux:
## What is Redux Toolkit?
Redux Toolkit is a package that provides a set of tools and best practices for writing Redux logic. It is designed to make writing Redux code faster and with less boilerplate. It can help you write Redux code more efficiently and avoid common pitfalls that can lead to bugs and performance issues.
## Basic Concepts of Redux Toolkit
### Store
The store is the central place where all the application state is stored. It is an object that holds the entire state of the application. You can access the state of the store using the `useSelector` hook provided by Redux Toolkit. You can also update the state of the store using the `dispatch` function provided by Redux Toolkit.
### Reducer
A reducer is a function that takes the current state and an action as arguments and returns the new state. Reducers are pure functions, which means they do not have side effects and always return the same output for the same input. You can define
### Slice
A slice is a collection of reducers and actions that are related to a specific part of the state. Slices are used to organize the Redux logic into smaller, more manageable pieces. You can define a slice using the `createSlice` function provided by Redux Toolkit.
### Action
An action is a plain JavaScript object that describes an event that occurred in the application. Actions are used to update the state of the store.
### Selector
A selector is a function that takes the state of the store as an argument and returns a part of the state. Selectors are used to access the state of the store in components.
### Dispatch
The `dispatch` function is used to dispatch actions to the store. You can use the `dispatch` function to update the state of the store by dispatching actions.
## Getting started
Let's first create a React App using Vite.
```bash
npm create vite@latest
```
Follow the instructions to create a new React app.
After you've installed the dependencies, we can now install Redux Toolkit.
```bash
npm install @reduxjs/toolkit
```
Also let's install `react-redux` which is the official Redux bindings for React.
```bash
npm install react-redux
```
## Creating a store
Let's create a store using Redux Toolkit. Create a new folder called `store` in the `src` directory and create a new file called `index.js` inside the `store` folder.
```javascript
import { configureStore } from "@reduxjs/toolkit";
const store = configureStore({
reducer: {
// Add your reducers here
},
});
export default store;
```
This is the basic setup for creating a store using Redux Toolkit. You can add your reducers to the `reducer` object in the `configureStore` function.
Let's initially create a counter reducer to store a count variable and then use this reducer in the store.
Create a new file called `counterSlice.js` inside the `store` folder.
```javascript
import { createSlice } from "@reduxjs/toolkit";
const counterSlice = createSlice({
name: "counter",
initialState: {
value: 0,
},
reducers: {
increment: (state, action) => {
state.value += action.payload;
},
decrement: (state, action) => {
state.value -= action.payload;
},
},
});
export const { increment, decrement } = counterSlice.actions;
export default counterSlice.reducer;
```
Here, we have defined a counter slice with an initial state of `0` for value and two reducers `increment` and `decrement` to increment and decrement the value respectively.
In the `reducers` object, we define the reducers for the slice. Each reducer is a function that takes the current state as an argument and returns the new state.
Whatever we pass as the payload to the `increment` and `decrement` actions will be available as `action.payload` in the reducer.
All the payloads passed to the action will be available as `action.payload` in the reducer.
Now, let's add this reducer to the store.
```javascript
import { configureStore } from "@reduxjs/toolkit";
import counterReducer from "./counterSlice";
const store = configureStore({
reducer: {
counter: counterReducer,
},
});
export default store;
```
Now, we have added the `counterReducer` to the store. The `counterReducer` will be responsible for updating the state of the `counter` slice in the store.
## Providing the store to the app
We need to provide the store to the app so that all the components can access the state of the store. This can be done by wrapping the app component with the `Provider` component provided by `react-redux`.
Open the `main.jsx` file in the `src` directory and wrap the `App` component with the `Provider` component.
```javascript
// ...
import { Provider } from "react-redux";
import store from "./store/index.js";
// ...
ReactDOM.createRoot(document.getElementById("root")).render(
,
);
```
Now, the store is provided to the app and all the components can access the state of the store using the `useSelector` hook provided by Redux Toolkit.
## Using the store in components
Let's create two child components of the `App` component, one to increment/decrement the counter value and another to display the counter value.
Inside the `App` component itself, create a new component called `CounterDisplay` to display the counter value.
```javascript
const CounterDisplay = () => {
const count = useSelector((state) => state.counter.value);
return (
Counter Display{" "}
(I am the child 1){" "}
Counter value: {count}
);
};
```
And another component called `CounterControls` to increment/decrement the counter value.
```javascript
const CounterControls = () => {
const dispatch = useDispatch();
return (
Counter Controls
(I am the child 2)
);
};
```
Here, we are using the `useSelector` hook to access the state of the store and the `useDispatch` hook to dispatch actions to the store.
We are also passing the payload `1` to the `increment` and `decrement` actions. This payload will be available as `action.payload` in the reducer.
The imports for `useSelector` and `useDispatch` are as follows:
```javascript
import { useSelector, useDispatch } from "react-redux";
```
Now, let's use these components in the `App` component.
```javascript
import "./App.css";
import { increment, decrement } from "./store/counterSlice";
import { useSelector, useDispatch } from "react-redux";
function App() {
// Child component: Counter rDisplay
const CounterDisplay = () => {
const count = useSelector((state) => state.counter.value);
return (
Redux Toolkit Implementation{" "}
(I am the parent component){" "}
);
}
export default App;
```
Now, you can see the counter value displayed on the screen and you can increment/decrement the counter value by clicking the buttons.
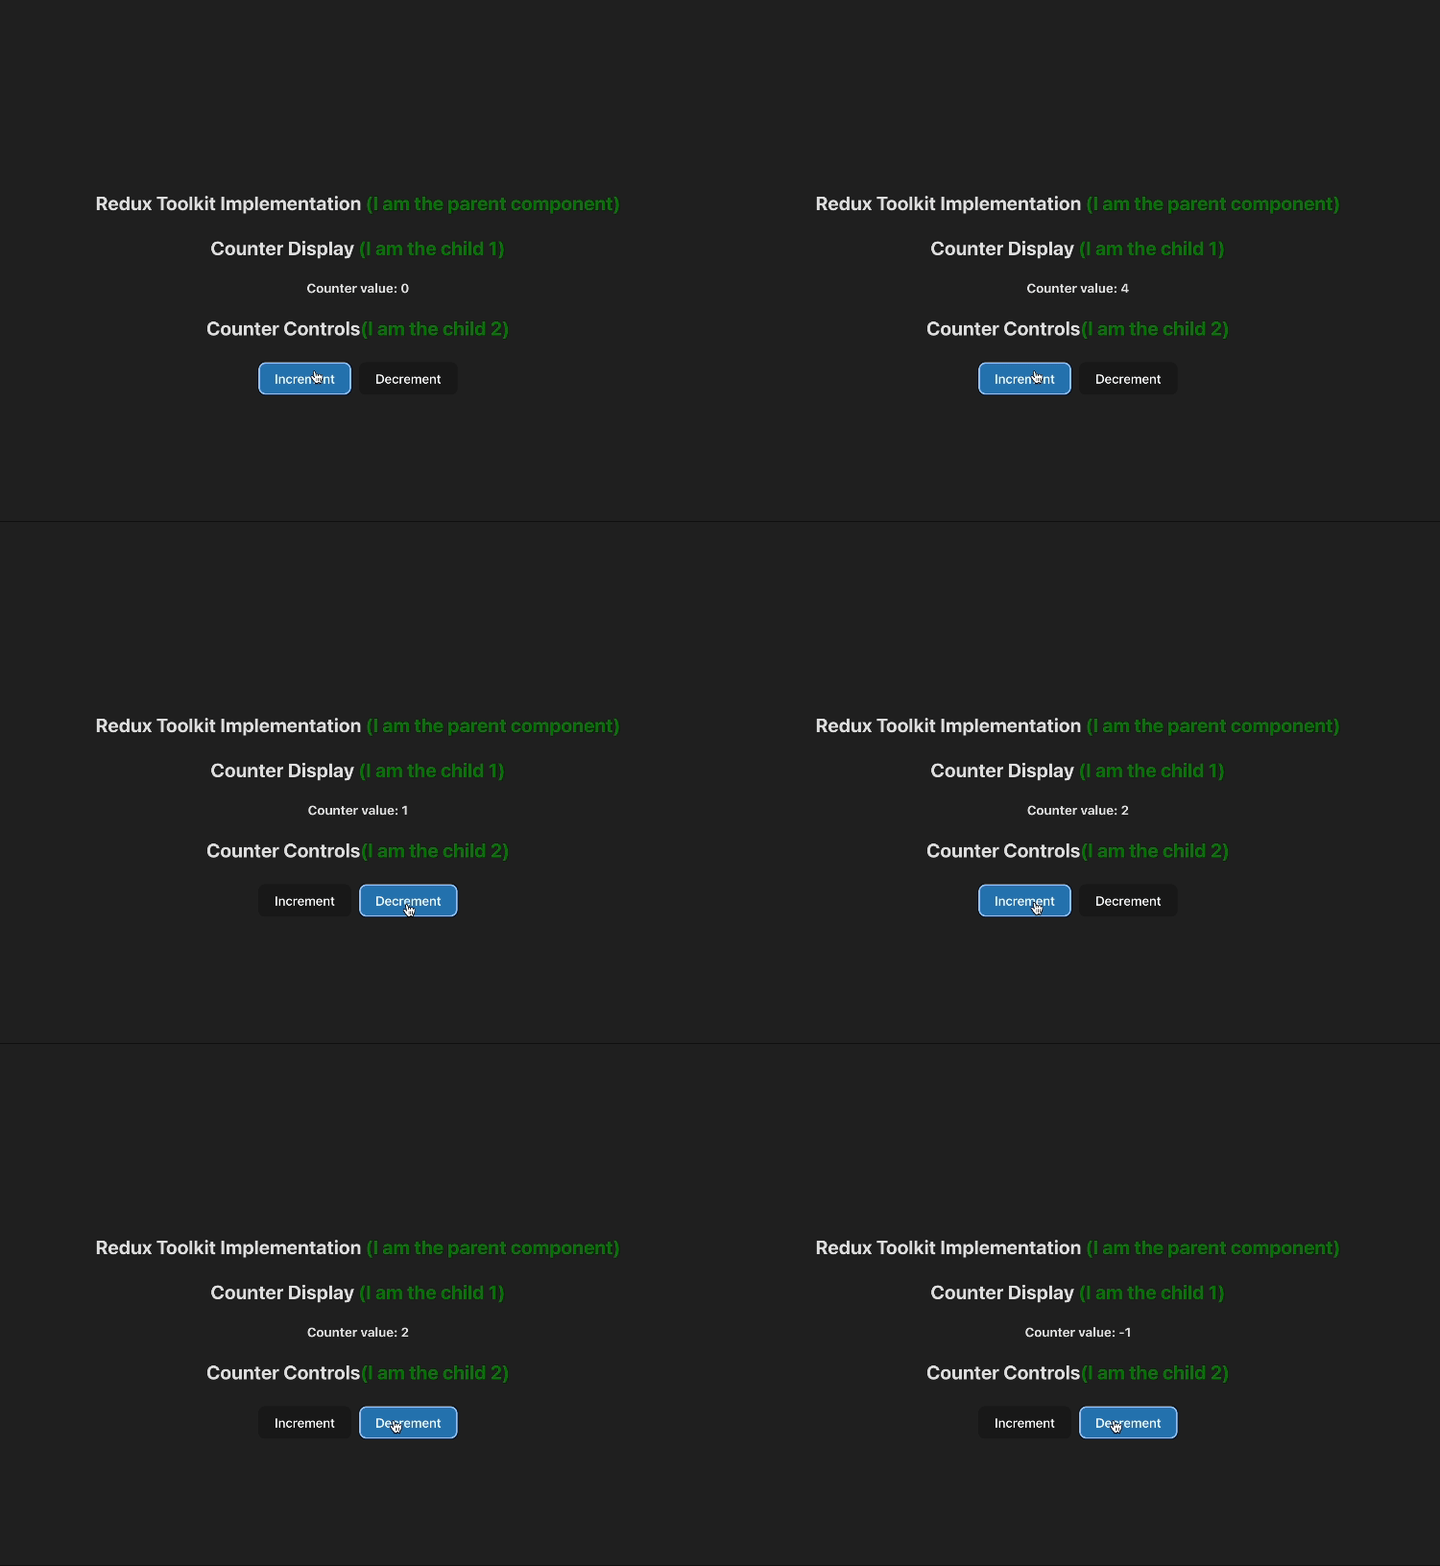
This clearly means that the two child components are sharing the state of the counter value using the Redux store. There is no need of passing the state up to the parent component and then down to the other child components. This is the power of Redux Toolkit.
## Conclusion
In this article, we learned the basics of Redux Toolkit and how to use it for state management in React applications. We created a store using Redux Toolkit, added a reducer to the store, provided the store to the app, and used the store in components to share the state between them. We also learned how to use the `useSelector` and `useDispatch` hooks provided by Redux Toolkit to access the state of the store and dispatch actions to the store. I hope this article helped you understand the basics of Redux Toolkit and how to use it in your React applications.
Last updated on June 4, 2024