Deploying React Apps to Github Pages with Github Actions
Learn to deploy React applications seamlessly using GitHub Actions to automate your workflow and push to GitHub Pages efficiently.
Deploying a React application can be a tedious and time-consuming process, especially when you're managing multiple projects or collaborating with a team. However, with the power of GitHub Actions, you can automate this process and ensure a seamless deployment workflow directly to GitHub Pages. In this blog post, we'll explore how to leverage GitHub Actions to simplify the deployment of your React apps to GitHub Pages.
Understanding GitHub Pages
GitHub Pages is a static site hosting service that allows you to host your website directly from a GitHub repository. It's an excellent option for hosting static websites, documentation, and personal blogs. GitHub Pages supports custom domains, HTTPS, and Jekyll, making it a versatile platform for hosting various types of content.
Getting Started
Let's start by setting up a new React project using Vite. If you already have an existing React project, you can skip this step.
pnpm create vite@latest
After setting up your React project, create a new GitHub repository and push your code to the repository using the following commands:
git init
git add .
git commit -m "Initial commit"
git branch -M main
git remote add origin <repository-url>
git push -u origin mainInstalling GitHub Pages
Next, install the gh-pages package, which simplifies the deployment of your React app to GitHub Pages:
pnpm add gh-pages --save-dev
Configuring Deployment Scripts
In your package.json file, add the following scripts to automate the deployment process:
"scripts": {
  "predeploy": "npm run build",
  "deploy": "gh-pages -d dist", // here `dist` is the build folder of your project
  "postdeploy": "echo 'Deployment complete!'",
}Inside the vite.config.js file, add the following configuration to ensure that your React app is deployed correctly:
export default defineConfig({
  base: "/<repository-name>/", // add repository name here
  plugins: [react()],
})Deploying to GitHub Pages
To deploy your React app to GitHub Pages, run the following command:
pnpm deploy
And that's it! Your React app is now deployed to GitHub Pages. You can access it using the following URL: https://<username>.github.io/<repository-name>/.
When you make changes to your React app and want to redeploy, simply run the npm run deploy command again. However, manually running this command every time you make changes can be cumbersome. This is where GitHub Actions come into play.
What is GitHub Actions?
GitHub Actions is a powerful automation tool that allows you to define custom workflows directly within your GitHub repository. You can use GitHub Actions to build, test, package, release, and deploy your code without leaving GitHub. By creating a workflow file, you can define the steps required to automate your deployment process and ensure that your React app is always up-to-date.
Automating Deployment with GitHub Actions
GitHub Actions allow you to automate your workflow directly within your GitHub repository. By creating a workflow file, you can define the steps required to build and deploy your React app automatically. Let's create a new workflow file in your repository:
-
Create a new directory named
.github/workflowsin the root of your repository. -
Inside the
.github/workflowsdirectory, create a new file nameddeploy.yml. -
Add the following workflow configuration to the
deploy.ymlfile:
name: "Deploy to GitHub Pages"

on:
    push:
        branches:
            - master
            - main

jobs:
    deploy:
        runs-on: ubuntu-latest

        steps:
            - uses: actions/checkout@v2

            - name: Setup Node.js
              uses: actions/setup-node@v1
              with:
                  node-version: "18"

            - name: Install dependencies
              run: npm install

            - name: Build
              run: npm run build

            - name: Deploy
              uses: peaceiris/actions-gh-pages@v3
              with:
                  github_token: ${{ secrets.GITHUB_TOKEN }}
                  publish_dir: ./dist
publish_branch: gh-pagesCommit and push the changes to your repository.
GitHub Actions will now automatically build and deploy your React app to GitHub Pages whenever you push changes to the main branch. You can monitor the workflow's progress directly within your GitHub repository under the "Actions" tab.
Read-write permissions
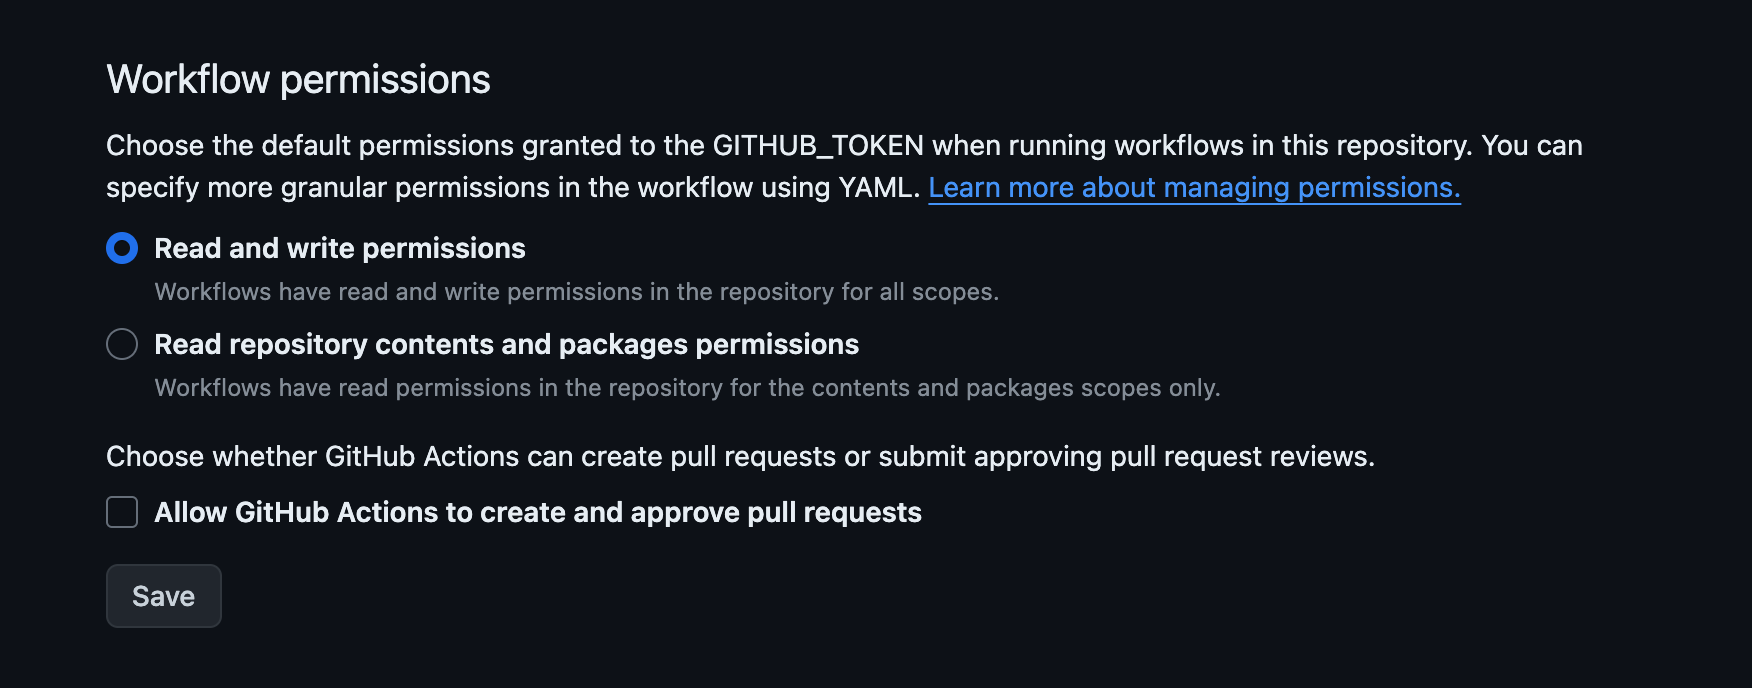
If you encounter any issues with the deployment process due to read-write permissions, you can update the permissions of the workflow secret by following these steps:
-
Navigate to your GitHub repository settings.
-
Under Actions -> General tab, enable the "Read and write" permissions for the secret, as shown below:

Click "Save changes" to update the permissions and re-run the workflow.
After this, your React app will be automatically deployed to GitHub Pages whenever you push changes to the main branch. This automation streamlines the deployment process and ensures that your React app is always up-to-date and accessible to your users.
Conclusion
In this blog post, we explored how to deploy a React app to GitHub Pages using GitHub Actions. By automating the deployment process, you can save time and effort while ensuring that your React app is always up-to-date and accessible to your users. GitHub Actions provides a powerful workflow automation tool that simplifies the deployment of React apps, making it easier to manage multiple projects and collaborate with your team. Try out this workflow automation today and unlock the secret to seamless React deployments with GitHub Pages!